I got back home a couple of weeks ago after my quick trip to Red Bay, Al
to have maintenance done to the coach.
It was a very successful trip. The folks at the factory are knowledgeable,
efficient, and friendly.
The best part was the bill. It was extremely reasonable and much
less than I was expecting. I had about 17 items repaired and am happy to
report that the coach is currently in 100% perfect working order.
On the way home I stopped at Old Federal Army Corps Campground
on Lake Lanier - just north of Atlanta.

As you can see from these photos - its is quite a nice place.
I now have another place to visit for longer as we travel by.
This was the view from the passenger side.
I was on a long peninsula so on the driver side was a water view as well.
Quite nice!

Getting home it was time to get to work.
WARNING:
BELOW IS A TECHNICAL DISCUSSION OF MY NEW SOLAR INSTALLATION.
IF YOU ARE PLANNING ONE IN YOUR RV IT WILL PROBABLY BE USEFUL
IF NOT - IT WILL PROBABLY BE A HUGE SNORE-FEST!
YOU HAVE BEEN WARNED!!
The final step of my electrical upgrade to the coach was the installation of
a solar charging system like I had on the Montana.
My power needs in the Motorhome are greater so the system was sized larger accordingly.
One job that I had someone do for me in Red Bay was having a combiner box
mounted on the roof, a hole drilled thru the roof, and a messenger line snaked
from the roof to the basement. This allowed me to pull the eventual wires that I would need
from the Solar Panels to the Solar Controller.
Having it done by people who know the rig inside and out was a huge time saver.
They ran the hole thru the roof just in front of the holding tank vents.
They pulled the yellow rope thru for me and buttoned it back up for my use later.

Unfortunately - they drilled the holes to small for the amount of wires that I would
eventually pull thru. I wound up breaking the line and had to snake a new one
thru after enlarging the holes along the way.. no big deal however - the important thing
was that I now knew the pathway I would take to the basement.

Rather than buy expensive pre-made MC4 PV wire, I bought a spool of PV wire,
a bunch of MC4 connectors, and a special MC4 crimping tool. The crimper
I got from Amazon for about $40 and worked perfectly.
The fancy German crimper tool is over $300!
I was able to make my own cables to the exact lengths needed, saved a bunch of money,
and wound up with the crimper tool.
Shown below is a female connector but the process to make a male fitting is the same:
Slide the nut and gland back on the wire,
Strip the wire back about 3/8" or so.
Crimp the contact onto the wire.
Slip the contact into the black fitting on the left (it will click lock in place)
Slip the sealing gland into the fitting and..
Tighten the gland nut.

After making up and labeling both ends of the PV wires, I had to run them
from the roof combiner box down into the basement where the breaker box
and solar controller were to be located.
The connectors shown below would remain up on the roof and eventually plug into
the panels. The other end of these wires did not have connectors as they would be
attached to circuit breakers and the controller terminals.

Below is a simple schematic of the system showing only the positive leads.
The negative leads were combined the same way and then the two negative leads
(#10 AWG) went straight to the negative input on the controller where they combined.
By using a series to parallel combining layout with the panel wiring, I was able
to boost the panel output to about 35v allowing for smaller wire and low
transmission loss down to the controller.

I used #2 welding cable from controller to the batteries.
This was a trade off.
I normally like to keep voltage drops below 1.5% but because of the larger size of this array,
it would require just too large a wire.
At full output my loss will be about 2.75% +/-
At 60 amps or less I will be below 2%
Here is the wiring going into the controller (L-R)
From the batteries: Bat+ Bat- From the array: PV- PV+
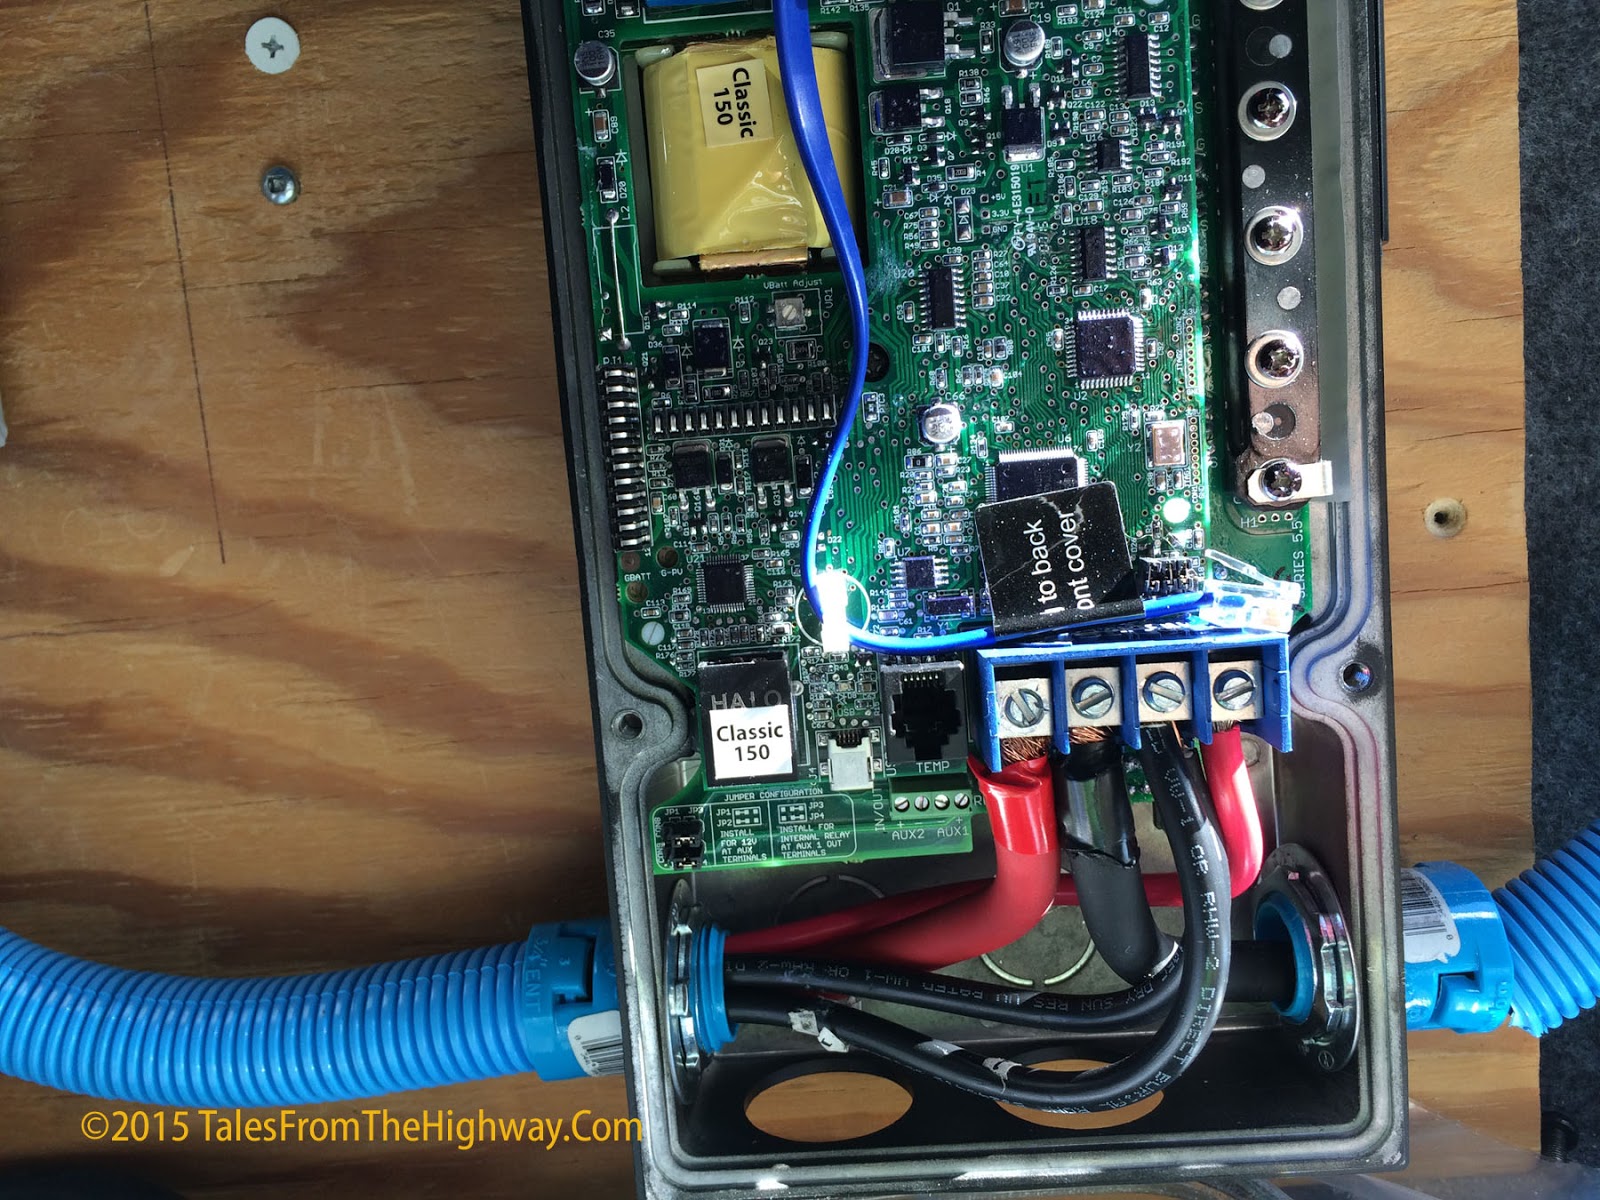
Later I installed temperature, network and shunt sensors to complete the wiring.
I will be able to control, log, and monitor the controller from my Macbook.
If I stored the RV somewhere I could do it over the internet.
Below is where the Controller output goes to the batteries.
For the pos lead I mounted a 125a catastrophe fuse on the hot side of the main house, shutoff.
I mounted the neg lead to the house side of the shunt that provides data to the energy monitor.
Its important to mount the negative to the house side so that when you are charging, the current
flows thru the shunt and your energy monitors can then record it flowing into the batteries.
On a shunt all loads should be on the downstream (away from the battery) side of the shunt.
The only thing on the battery side of the shunt should be the battery.

The Midnite Classic 150 is a bit more sophisticated controller than the Tristar 60 that I
had in the 5th wheel. While I liked the simplicity of the Tristar, it could not handle the current
that I would produce with this array so I needed something bigger. Hence the Classic 150.
One nice feature of the classic is that you can add the optional "Whizbang" monitor to your shunt.
This then reports back to the Controller
and tells it how much current is flowing into the batteries.
This is important why???
You can set a controller to go into absorb for xx hrs and then go into float.
But
A better way is to tell the controller when current flow into the batteries drops to xx amps,
its time to go into float.
This is more exact and prevents under or overcharge.
My 900ah lifeline AGM bank says when current flow = .5% of the battery bank the
bank is fully charged and the charger should go to float charge.
So .5% of 900ah is 4.5a. Meaning that when current flow drops to 4.5a the controller should
end absorption charging and enter float charging.
The problem is the controller is not only charging batteries, its also providing any current house
loads, lights etc. The controller could be providing 10a but its all for the house loads.
The whiz bang reports back to the controller that the current flow has dropped to xx
and then the parameters I set in the controller now realize the batteries are fully charged
and its time to float them.
Below you can see the Whizbang mounted on the side of the Shunt.
The blue and orange wires are the preexisting wires that were on the shunt reporting to
my energy monitor before mounting the Whizbang. My energy monitor still functions
as normal.
Since I have $2,300 worth of house batteries, anything that can be done to
take care of them is going to save me a lot of $$'s long term.

Below is the controller all wired in (I still had a few things to do but mostly done)

Braving thunderstorms, dark clouds, nearby lightening and a contestant onslaught
of mosquitos, Kate and I climbed up onto the roof for the final step...
Attaching the Panels.
Below we finally got the panels mounted and all wired in.
of mosquitos, Kate and I climbed up onto the roof for the final step...
Attaching the Panels.
Below we finally got the panels mounted and all wired in.
I used Stainless Steel Z-brackets for feet and I decided to try an alternative method
and used 3M 5200 to glue them down to the fiberglass roof.
There are a lot of wires and condensate lines running under the roof and I'd prefer
not to use screws and run the risk of hitting something.
Having used 5200 on my boat I know how tenacious this stuff sticks to fiberglass once cured.
It will pull the gelcoat off before it releases.
While not as tenacious a bond to stainless, its still in the several hundred lb per sq in
shear strength so I think it will be just fine. There really is not much loading on the panels
going down the road anyway.

Finally it was time to throw the switch.
As you can see from the picture above - today was a cloudy day.
I had some very filtered sunshine and when I threw the two PV breakers,
I was greeted by almost 50amps headed into the batteries!
I was getting 60% output on a cloudy east coast day.

The layout of the panels on the roof will allow me unshaded production for most of the day
when I am in the proper orientation.
My goal in designing this system was to equal and exceed what I had in the Montana.
Winters in the Arizona desert, I was always able to work all day
with printers, scanners, & TV's running...
Never or almost never (several rainy days in a row perhaps) did I need to use a generator.
It's just this silly little game I like to play...
And bragging rights that impress no one but me.
My goal here was to hopefully go even more cloudy days
without needed to run the generator.
Time and testing will tell for sure but my first blush reaction is
I think I did it.
It will be another comfortable Arizona winter none the less.
You might have mounted the controller on the dashboard. The compliments would never stop!! :)
ReplyDeleteAwesome project, thank you for sharing. Can you tell me more about the panels you selected, what your costs were and where you found the best prices? Also, why limit the series strings to 2 panels, wouldn't the controller input handle the voltage of 4 panels in series thus allowing smaller conductors?
ReplyDeleteAwesome project, thank you for sharing. Can you tell me more about the panels you selected, what your costs were and where you found the best prices? Also, why limit the series strings to 2 panels, wouldn't the controller input handle the voltage of 4 panels in series thus allowing smaller conductors?
ReplyDeleteGlad all your repairs were completed quickly and reasonably priced. I passed on the solar discussion. Thanks for the warning!
ReplyDeleteThe Solar Power is considered as the new energy for us and it is green power for the environment. We should encourage more people using it in the life.
ReplyDeleteThanks for some other wonderful article. The place else may just anyone get
ReplyDeletethat type of info in such an ideal means of writing? I have a presentation nesxt week, and I
am on thee search ffor such information.